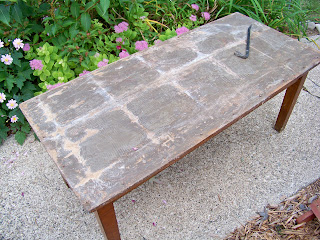
Whew!!! This one was a doozie!!! Do you remember that table I got a couple weeks ago out of someones garbage on my way to bringing the kids to school? The one where I dragged it home in my P.J.s and started working on dismantling the top while still in said P.J.'s??
Well if not...here it is. :)
This is the story of this UGLY table, that was sitting in the garbage. Now you will notice the wonderful and ever classy metal floor edging around the plastic tiles that were glued to the top. I imagine that this was some sort of effort to cover the ugly stains on the top????
So as soon as I got home and washed my hands...(I had to do that about 100 times..this thing had SOMETHING living in it at one time)
I started to take the COVER or whatever you want to call it off of the top of the table.
Notice if you will the wonderful glue left behind from these tiles...PSHHHTTTT!! Nothing that a little caffeine and elbow grease can't take care off..............................
Oh yeah, and a HEAT GUN and a chisel....:)
Once I scraped the glue off I got to sanding.....
and sanding.....and then the sky's opened up and it rained, and rained and rained...and finally I had to work on it in the garage, because I couldn't wait for the rain to stop. Every time I tried to bring it out in the yard the Sky's would turn dark and it would start pouring.
So here it is in the garage. My lovely husband has stopped even getting mad at me for the mess in the garage..though he swears the cars WILL be parked in there by Saturday....:)
I knew the look that I wanted for this table, but much like painting a picture I just had to let the table tell me how it was going to go....:)
Soooo I got some bright red spray paint. and sprayed the top. While it was drying I got to the drawers...or lack there of...
as you can see they were all warped and not worth saving. I ever so gently with a rubber mallet smack the crap out of the sides and loosened the fronts from the drawer.
I then flipped the table upside down and screwed up through the bottom and made false fronts with the drawer fronts.
Then I sprayed the rest of the table with red.
Then the table decided she wanted a little orange and not as much red...so I added some pumpkin orange spray paint.
Then I dry brushed some antique white paint on it...at this point pretty much all of the kids said it looked like strawberry shortcake....:)
Luckily I was not finished.
 When she dried I distressed her some more...and stained over the top with my favorite provincial stain.
and now she is starting to look like and old barn wood sign that I wanted.
I searched and searched for some graphic that I would like on the top, but once again...I wanted something different. So with a combination and influence of all of the old vintage pictures I had seen online I kind of free handed a sketch and then used the word processor to come up with an old coffee sign. Continue on to part 2 here...
Pin It


5 comments:
SHE IS GORGEOUS!!!!!!!!
Wow!!! You did such a great job!!
I love how you gently "Smacked the Crap out of it"! LOL You did a tremendous amount of work restoring (kinda) that table and it is beautiful. I love the design you did on pt. 2! Thanks for linking up.
Wow, I love this. I wish we could hang out & "Dumpster Dive" together. {I'm the only one I know in real life who does this!} I really enjoyed seeing the process you went through to make it awesome. Thanks for linking up to Fabulous Friday!
Warmly, Michelle
Wow--you went through a lot to get to the end result, but it was worth it! Love your table!
Post a Comment